Bi-Quad antenna for Wi-Fi
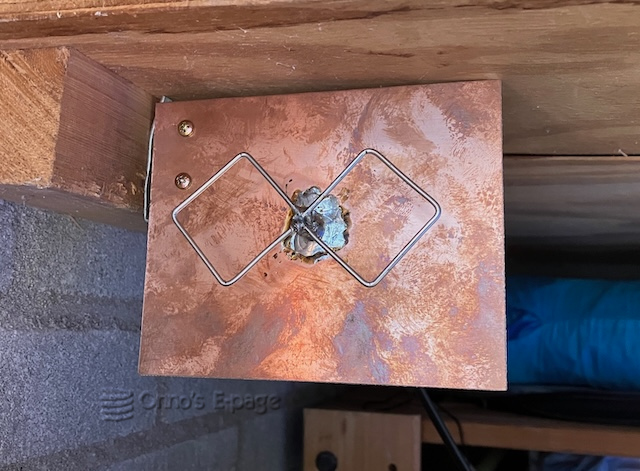
The Bi-Quad antenna is a directional antenna, projecting the radio waves in one direction. I constructed this aerial to extend the range of a Wi-Fi device located in a shed in my back yard.
I have a few home automation devices around the house. One of these I wanted to install in the shed back in my garden. I wondered if this would work, as it would be quite far away from the Wi-Fi router. Also, the signal would have to travel though several walls. I was pleased to see that the device could connect to the Wi-Fi network right away. It did better than my smartphone that experienced bandwidth and latency problems in the shed. Although it was working surprisingly well, I was slightly worried that somewhere in the future the device would develop connectivity problems. Its WiFi signal quality indicator on the dashboard app was always showing 2 marks out of 4 in a menacing yellow color.
I didn’t like the idea of installing Wi-Fi extenders and use more bandwidth and power. After all, the device being stationary, a directional antenna would be an excellent solution to concentrate the signal towards the Wi-Fi access point.
I did some research on Internet and found there are many interesting directional antenna types usable for Wi-Fi. Among these, the so-called “Cantenna” and “Bi-Quad” types are easy to construct. I chose the Bi-Quad because it looks like a serious antenna. However, one must respect the laws of physics and adhere to design rules to get a well functioning antenna.
I found a clear and detailed description and building instructions by a Dutch radio amateur on the ultieme biquad Wifi antenne bouw pagina. It also contains references to more sites explaining the Bi-Quad and different aerial types. I won’t copy the descriptions here, they are easy to find.
I decided to construct the antenna using a brass tube as support for the radiator. I soldered the tube though a hole in a piece of copper clad circuit board. Then I formed the Bi-Quad radiator from a 244‑mm piece of stretched copper wire and soldered it to the tube. Next, I took a piece of RG‑58 coaxial cable, stripped 5 cm of the outer jacket and threaded it through the tube. Soldered it to the radiator. That just went well. Next time I’ll use a Teflon type of coax cable to avoid the risk of melting the dielectric. Finally, attached an SMA-connector to the cable.
I detached the rod antenna from my device and connected the Bi-Quad. The device app still was showing 2 marks out of 4 signal quality. I wondered. Had I not followed the design rules? What had I done wrong? How could this be? My Bi-Quad under the roof should perform much better than the simple rod on the back of the device sitting in an awkward place, but yet it didn’t make any difference?

I tried removing the antenna altogether and see what the app would show on the dashboard. It kept showing 2 marks. Only after 15 minutes the dashboard was updated and showed a red warning mark. When I reconnected the Bi-Quad, almost immediately the device reappeared in the dashboard with 4 marks out of 4. That was rewarding. I just needed patience.
Building this antenna was an interesting project. And I am confident that the WiFi communication from the device in my shed will be as reliable as possible.
